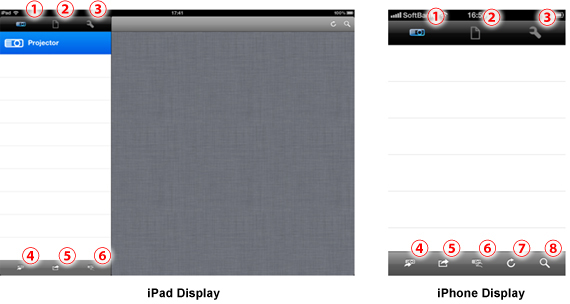
1. ![]() [Projector]Tool: To register and modify projector registration
[Projector]Tool: To register and modify projector registration
2. ![]() [Content]Tool: For document, image, and web content management
[Content]Tool: For document, image, and web content management
3. ![]() [Setting]Tool: For iCloud settings and application status confirmation
[Setting]Tool: For iCloud settings and application status confirmation
4. ![]() [Projection]Button: To project the content to Maxell LCD projectors
[Projection]Button: To project the content to Maxell LCD projectors
5. ![]() [Option]Button: To set presenter mode settings and set the display mode slideshow
[Option]Button: To set presenter mode settings and set the display mode slideshow
6. ![]() [Remote Control]Button: To remotely control Maxell LCD projectors
[Remote Control]Button: To remotely control Maxell LCD projectors
7. ![]() [Update]Button: To update the status of registered projectors
[Update]Button: To update the status of registered projectors
8. ![]() [Discovery]Button: To view registered projectors and manually register projectors
[Discovery]Button: To view registered projectors and manually register projectors
1. Interface of Marker function
1-1. Basic function
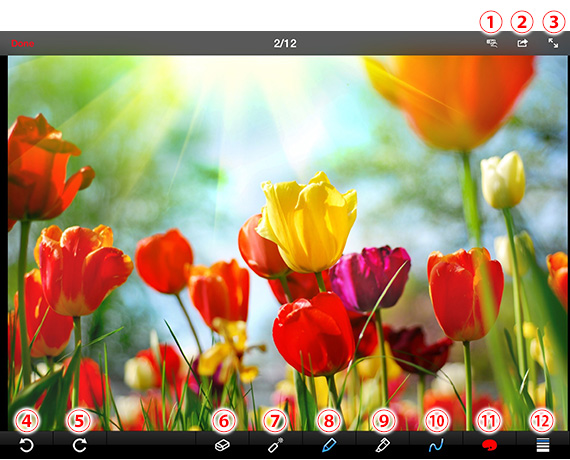
1. ![]() [Remote Control]Button: To remotely control Maxell LCD projectors
[Remote Control]Button: To remotely control Maxell LCD projectors
2. ![]() [Open in / Save to Camera roll]Button: To open an image drawn as “.png” by other app
[Open in / Save to Camera roll]Button: To open an image drawn as “.png” by other app
3. ![]() [Full Screen On / Off]Button: To display contents on Full Screen
[Full Screen On / Off]Button: To display contents on Full Screen
4. ![]() [Undo] Button
[Undo] Button
5. ![]() [Redo]Button
[Redo]Button
6. ![]() /
/ ![]() [Erase / Delete All]Button
[Erase / Delete All]Button
7. ![]() [Pointer Mode]Button
[Pointer Mode]Button
8. ![]() [Pen Mode]Button: To draw freely by handwriting
[Pen Mode]Button: To draw freely by handwriting
9. ![]() [Highlighter Pen Mode]Button: To draw freely by translucent highlighter pen
[Highlighter Pen Mode]Button: To draw freely by translucent highlighter pen
10. ![]() /
/ ![]() /
/ ![]() /
/ ![]() [Figure Mode]Button: To draw lines, squares, and circles
[Figure Mode]Button: To draw lines, squares, and circles
11. ![]() [Color selection]Button: To select 9 colors(black, white, red, orange, yellow,
[Color selection]Button: To select 9 colors(black, white, red, orange, yellow,
green, light-blue, blue, and pink)
12. ![]() [Line Weight]Button: To select line weight in 5 types
[Line Weight]Button: To select line weight in 5 types
2. Interface of Camera function
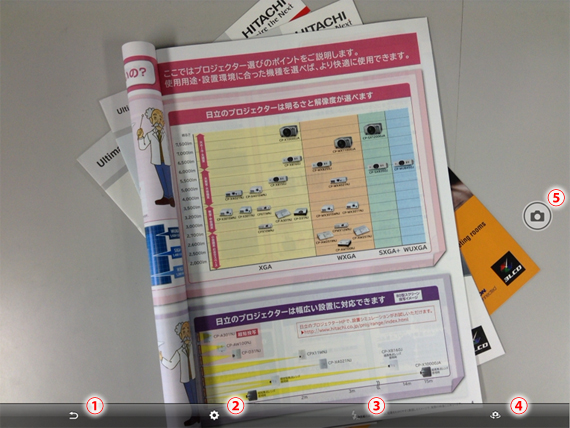
1. ![]() [Back]Button: To go back to the main menu from Camera Photograph Mode
[Back]Button: To go back to the main menu from Camera Photograph Mode
2. ![]() [Option]Button: To set preview On / Off and Grid On / Off
[Option]Button: To set preview On / Off and Grid On / Off
3. ![]() [Setting Flash]Button : To set Flash On / Auto / Off
[Setting Flash]Button : To set Flash On / Auto / Off
4. ![]() [Camera Rotation]Button: To select front-face and back-side camera
[Camera Rotation]Button: To select front-face and back-side camera
5. ![]() [Photograph]Button: To photograph a object
[Photograph]Button: To photograph a object
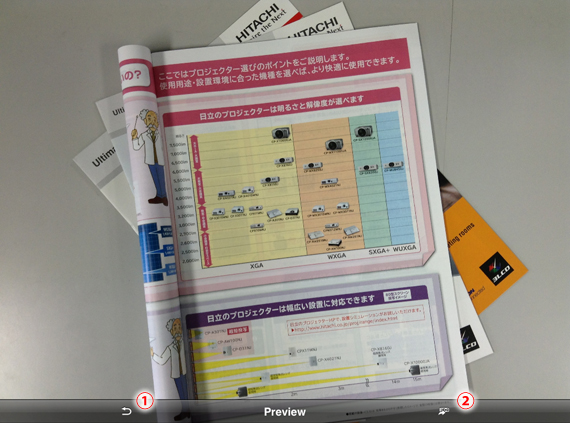
1. ![]() [Back]Button:To go back to photograph mode
[Back]Button:To go back to photograph mode
2. ![]() [Projection]Button: To project a captured image to Maxell LCD Projector
[Projection]Button: To project a captured image to Maxell LCD Projector
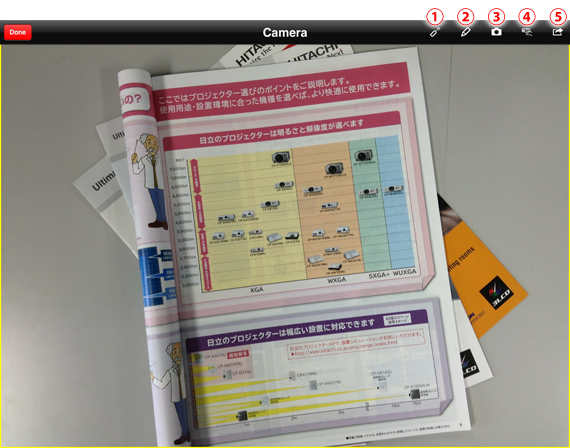
1. ![]() [Pointer Mode]Button:To start Pointer Mode
[Pointer Mode]Button:To start Pointer Mode
2. ![]() [Pen Mode]Button: To draw freely by handwriting
[Pen Mode]Button: To draw freely by handwriting
3. ![]() [Photograph]Button: To start Photograph Mode
[Photograph]Button: To start Photograph Mode
4. ![]() [Remote Control]Button: To remotely control Maxell LCD projectors
[Remote Control]Button: To remotely control Maxell LCD projectors
5. ![]() [Option]Button: To set Presenter Mode, Display Mode, and Slideshow
[Option]Button: To set Presenter Mode, Display Mode, and Slideshow
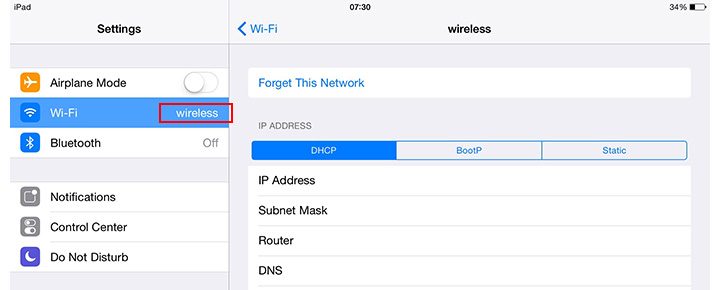
If the Wi-Fi icon is not displayed on the upper left of the screen(to the right of "iPad"), set the following on the iPad.

On the iPad, check the checked wireless network name in [Settings] - [Wi-Fi] - [Choose a Network...].
1. If connecting directly, not via an access point.(Ad hoc mode)
-Projector Settings
Set the following in [Network] - [Wireless LAN Settings] in the projector's advanced menu.
-iPad / iPhone Setting
The IP address assigned to the projector changes dynamically. If the AC power of the projector is turned OFF or after a certain period of time, the IP address of the projector may change. In such cases, the IP address previously registered for the projector and the current IP address of the projector differ, and the projector must be registered again.

In [Setting] - [iCloud], if [Use iCloud] is set to [ON], the document index is automatically read from iCloud and the document list is displayed. Documents must be downloaded from that list. To download a document, make sure the iPad/iPhone is connected to the network and tap the document.
It is incompatible with mirroring function. Therefore, it is impossible to project videos and sound.
There is no limitation of the number of connections in Adhoc mode standard. But speed of Adhoc mode is very slow. And in the cases of connecting several PCs to a projector, it depends on the situation whether PCs can be connected correctly or not. When you connect a PC to a single projector, there is no problem with connection and projection.
Set the following if Projector Discovery application (PJ Quick Connection) does not operate properly and a projector is not recognized on iPhone/iPad running iOS 9 or later.
Step1. On the iPhone/iPad, select [Settings] - [Wi-Fi].
![On the iPhone/iPad, select [Settings] - [Wi-Fi].](images/pj_connection/q7_01.jpg)
Step2. Select Wireless or SimpleAccessPoint of SSID (access point name)set in the projector.
Then select the [Information] icon.
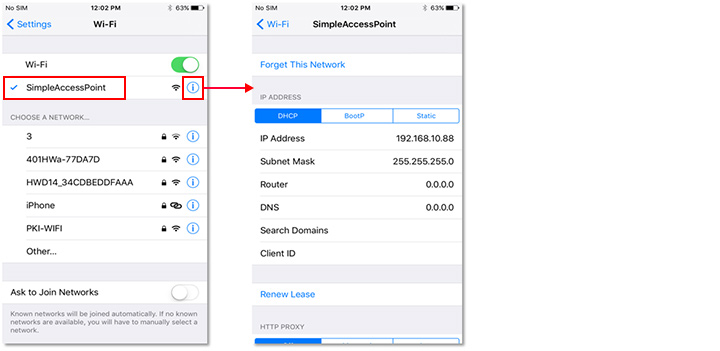
Step3. Change the IP Address setting.
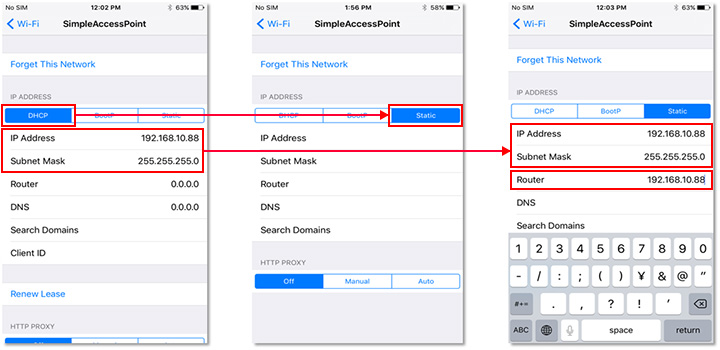
Take a note of IP Address and Subnet Mask before setting the following.
1. DHCP :
Change [DHCP] to [Static]. When doing so, [IP Address], [Subnet Mask], and [Router] change to blank.
2. IP Address/Subnet Mask :
Enter IP Address and Subnet Mask displayed at the time of setting DHCP.
3. Router :
Enter the same value as that of IP Address.
Step4. Start PJ Quick Connection and execute Projector Discovery. Then the projector can be recognized.
